Showing posts with label green. Show all posts

Saturday, March 17, 2012

Essie - Pretty Edgy, Kleancolor - Green With Envy, Color Club - Object of Envy

Slackity, slack slack.  Actually I've been doing a LOT of knitting, and frequent polish changes and knitting don't really get along.

Anyway, here is my St Patrick's Day nails.  I think the Color Club is "tried" - everything else is untried, and yes, I've had Pretty Edgy since I did that comparison WAY back at the beginning of this blog and it was STILL sitting in my untried drawer.


Basecoat:  NailTek Foundation II (1 coat)
Color:  Essie Pretty Edgy (3 coats)
Color:  Kleancolor Green With Envy (1.5 coats)
Color:  Color Club Object of Envy (1 coat)
Topcoat:  Revlon Quick Dry Top Coat (1 coat)


Yes, that's a lot of coats, but I don't mind because this came out way better than I hoped it would.  Pretty Edgy applied flawlessly.  It was a tiny bit dustier than I expected, actually - I don't know if I'm just remembering it wrong, or it's changed slightly as it's been sitting untouched.  Anyway, I knew I was glittering it up, so no big deal.  Pretty Edgy was almost totally opaque in three coats.

Green With Envy has a very slightly green tinted base, or maybe the glitter is leaching out into the base a little.  Whatever the cause, the end result was that it added just the perfect amount of yellow to Pretty Edge, making it the perfect St Patrick's Day green.  It's a fairly chunky glitter - medium hex pieces, and a few tiny glitters, and of course I had trouble getting even distribution.  So when I finished applying I wasn't totally happy with it, so I pulled out...

Object of Envy.  I've worn this before and I think I felt like three coats would be reasonably opaque on its own.  Anyway, I applied one coat over everything and it's PERFECT.  The only thing I would do differently next year (and oh yeah, I'm definitely wearing this again) is apply Object of Envy before Green With Envy, so that the bigger glitter shines more.

Saturday, February 25, 2012

Misa - Phazers on Stunning

Phazers on Stunning is a green/rose-beige duo chrome shimmer, and should also be spelled "Phasers", but that's neither here nor there.

Basecoat:  NailTek Foundation II (1 coat)
Color:  Misa Phazers on Stunning (4 coats)
Topcoat:  Northern Lights Gold Holo (1 coat)
Topcoat:  Revlon Quick Dry (1 coat)


Funny thing about these photos:  When I was taking them, I was having trouble capturing the pink/rose color of this polish, but when I went to edit them I saw that even though all I could see was the green, all I got in the photos is the rose.

Anyway, this is a pretty thin and runny polish.  It was fairly sheer - I needed four coats and I still have a bit of VNL.  To be honest, I don't feel like this is a very exciting color, so I added a coat of the gold Northern Lights holo topcoat, and it didn't really help.

Wednesday, February 15, 2012

Zoya - Veruschka

Here's another swatch from long ago.  Veruschka is a deep green polish with shimmer.  This is a matte velvet polish.


Three coats, no basecoat.  I used topcoat on my index and ring fingers, and wow, it is gorgeous with topcoat. 

I do not know why this is, but I feel like the matte velvet Zoyas always have amazing application, and the straight matte polishes are awful.  Is it just me?

Tuesday, December 27, 2011

China Glaze - Glittering Garland and Snow Globe

I actually forgot I had worn this until I was editing photos of the last mani I wore.  I love these two polishes, just maybe not together, and I didn't even wear this out of the house.

Basecoat:  Salon Sciences Instant Artificials (1 coat)
Color:  China Glaze Glittering Garland (3 coats)
Topcoat:  China Glaze Snow Globe (1 coat)
Topcoat:  David (1 coat)


See?  Super pretty, just not sure they go together.  I test swatched a few combinations and ultimately decided on this one for some reason - I should have gone with the gold Northern Lights topcoat instead.  Oh well.

I've seen photos of Glittering Garland that look very different from my bottle - mine just looks like a plain dark green with glass fleck.  It's very pretty but it's not the outright glitter I've seen photos of.  Application was pretty good, and I didn't have any problems with cleanup.

My bottle of Snow Globe is from the initial release with all the other specialty glitters.  As a result, it was super thick and I had to thin it a lot, but it was still pretty thick.  I have a little bit of tip shrinkage, too.

Monday, December 5, 2011

Zoya - Mitzi

Mitzi is a lime green matte.  I should have put this up for Halloween.  Embiggen IF YOU DARE!


Basecoat:  Zoya Ridge Filler (1 coat)
Color:  Zoya Mitzi (3 coats)


Yuck.  Draggy, lumpy, thick, just nasty.  It's got to be the lack of shimmer - the other mattes don't apply like this one.  Even the blue one from this collection (I forgot its name) applied nicely.

These photos actually look a little worse than real life - I don't think I realized the pinky was that bad until I was editing the photos.

Saturday, December 3, 2011

Essie - School of Hard Rocks and Shine of the Times

Yeah, yeah, I'm slacking again.  The weather's been just lousy in Dallas this week - even these photos are under my desk lamp because there's just no good sun.

(Oops.  There's a China Glaze bottle top just outside of this crop that's in perfect focus, though.)
Basecoat:  Salon Sciences Instant Artificials (1 coat)
Color:  Essie School of Hard Rocks (3 coats)
Color:  Essie Shine of the Times (1 coat)
Topcoat:  David (1 coat)


First - due to the already-mentioned crappy weather, I applied this under a lamp, with much less ambient daylight as usual.  I really do think I could have stopped at two coats of School of Hard Rocks, but I just couldn't be sure enough without my usual (preferred) lighting conditions.  Anyway, this applied flawlessly - I sure do love Essie cremes.

Also, this is just ONE coat of Shine of the Times.  Usually with a flake topcoat like this I like to do at least two coats, but this SO did not need it.  I think the flakes are much denser than Nubar 2010 and Sally Hansen Hidden Treasure.  The downside, of course, is that this was so dense that it applied kind of like frosting - thick and goopy and not-spready.   I'm not sure I'd wear this exact combination again, but I love both of these polishes.

In other news, a new beauty supply store opened inside what used to be a Target near me.  (yes, it's HUGE!)  It doesn't have a whole lot of makeup (it's mostly hair care) but they do carry some brands I've never seen near me in person - a nice Kleancolor display (with some Chunky Holos!), Ruby Kisses, Ruby Kisses HD, NYX Girls polishes.  I picked up quite a few of these (though they're mostly neons) and hope to at least swatch some soon.

Friday, October 7, 2011

Color Club - Perfect Mol-Ten

Yep, another one from the "Foiled" collection.  Perfect Mol-Ten is a minty green.  It pulled a little bit dustier on me than I expected it to.


Basecoat:  Gelous (1 coat)
Color:  Color Club Perfect Mol-Ten (2 coats)
Topcoat:  Seche Vite (1 coat)


Ugh, awful cleanup.  Anyway, this applied much better than I expected from a foil.  Totally opaque in two coats.  And it dried super-fast.  I'm actually looking forward to wearing the rest of this collection.  I might have to buy a backup set to use for stamping.

Tuesday, September 27, 2011

China Glaze - Laser Lime

Laser Lime is a light green holographic polish.  The holographic effect is more scattered than linear.  Otherwise, it's very similar to L8R G8R - I believe the base colors are very very close if not identical.

Basecoat:  Gelous (1 coat)
Color:  China Glaze Laser Lime (4 coats)
Topcoat:  China Glaze Fast Forward Top Coat (1 coat)


Application was fairly typical for holo polishes - I went slowly and made sure not to go over any parts that already had polish unless they were totally dry.   Cleanup was a snap.

The Tronica collection of polishes has been hit or miss, to me.  Some bottles just don't look as holo as other bottles - Laser Lime is one of the non-holo-looking bottles.  And once it's on the nail it still looks non-holo, even under my desk lamp in my office.   I had to go outside to capture any holo at all, and even then it's fairly weak. Somehow, all the outside photos give me major lobster hands with this polish, which is odd - in real life it doesn't even remotely make my hands look red.

For once, I used four coats because a holo wasn't opaque enough.  I had no dragging or bald spots at all - it just wasn't very opaque.  If you look very closely in the photos you can see a hint of VNL - it's not visible in real life, but it definitely was at three coats.

Sunday, September 4, 2011

Chanel - Peridot

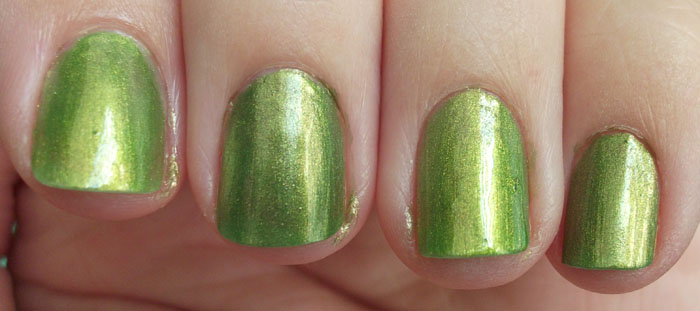
Here's one we've all seen a bajillion times - Chanel Peridot.  This is a gold/green duochrome metallic.  I was on the fence for a long time regarding Peridot - I couldn't decide if I wanted it or not.  Some photos were fabulous and others were just "meh".  My husband, the enabler, said "just buy it anyway, if you hate it, ebay it".


Basecoat:  Gelous (1 coat)
Color:  Chanel Peridot (2 coats!)
Topcoat:  David (1 coat)


Gorgeous, right?  Still, this polish seems to be - on me, anyway - mostly gold.  The green is not nearly as prominent as it is in the photos, mostly because I don't walk around with my hand in front of my face so I can see it. 

This polish nearly applied itself - it was that nice.  Went exactly where I wanted it, minimal cleanup, opaque and smooth in TWO coats!  It is a tiny bit brush-stroke-y, but I think a lot of polishes this metallic will have that.

Monday, August 29, 2011

Orly - Here Comes Trouble

Orly - Here Comes Trouble is a bright leafy green glitter.  The glitter is different sizes and shapes.  This collection has another polish similar to this one in a pink-purple color (of course, it's untried).


Basecoat:  Gelous (1 coat)
Color:  Orly Here Comes Trouble (4.5 coats)
Topcoat: Gelous (1 coat)
Topcoat:  David (2 coats)


I opted to wear this alone, because I'd seen other swatches where it was worn alone and fairly opaque.  Also, I knew I would just end up wearing even more coats if I used a similar color underneath.

This polish has a clear base.  At one coat, I gotta be honest, I wasn't sure this was going to cover completely.  At three coats it was almost right, so I went with one more coat, and dabbed on more where I had bald spots.

This one is a top-coat eater, for sure.  I did one coat of Gelous and a coat of David, and 24 hours later (yeah, I totally waited until the next day so I could get rid of the extra glitter on my skin) I still needed another coat of David.  Also, as far as cleanup goes - I recommend just being careful.  Cleanup will be a real biatch near the cuticles, so you can probably just give up on that now.

This probably really sucks to remove, too, but as usual, I picked this off, so it wasn't really a concern for me :)

Friday, August 5, 2011

OPI - Gargantuan Green Grape

This one technically is not an untried - at least it's not in my untried Helmer drawers (yes, I have four untried drawers).  However, I don't remember ever having worn this polish, and it certainly hasn't been recently.  I actually pulled out Mermaid's Tears and was considering wearing it until I decided it was just another dusty mint green that was going to look awful on me, especially this time of year.  Then I thought of GGG, and to be honest, I couldn't remember if I owned this or not.

Basecoat:  Gelous (1 coat)
Color:  OPI Gargantuan Green Grape (5 coats!)
Topcoat:  Out the Door (1 coat)


GGG is fairly thin in consistency.  I had some problems with streaking, and this is not really what I would consider an opaque polish.  I went to five coats and called it good, even though I still have some VNL, and on my right hand I still have some bald-ish spots.  I also have some bubbles, but that might be because I had a fan running in the room I was working in.  Because this polish was so watery I had no problems at all with cleanup - it was a breeze.

By the way, when I had Mermaid's Tears out, I compared it to Hey!  Get in Lime.  They're actually pretty close, but I'm not going to compare them - I'm sure someone's already done this one.

Wednesday, July 20, 2011

Sally Hansen - Jade Jump and Kleancolor - Holo Green

Why do I keep buying these minty greens even they look terrible on my skin regardless of the time of the year?

Jade Jump is a minty slightly dusty green.  Holo Green is a diffused holo pale green.  It's a little more "green" than Jade Jump, but when I swatched this on its own you can't really tell, so I opted to layer it.


Basecoat:  Salon Sciences Fiberglass Network (1 coat)
Color:  Sally Hansen Insta-Dri Jade Jump (2 coats)
Color:  Kleancolor Holo Green (2 coats)


The first photo is the most color-accurate.  O Hai, Lobster Hands!  Ugh.

I have a love-hate relationship with the InstaDri polishes.  The brush is hard to control on my pinky fingers so I usually end up with too big a gap at my cuticle, or I slop it everywhere.  Other than that, I think I've gotten the hang of this brush, though I still usually need two coats for complete coverage.

Unlike the Chunky Holo polishes, I didn't need to thin Holo Green at all.  It actually didn't even smell as much as the Chunky Holos I've worn do.  I will definitely want to try this over something else, because it's lovely and the holo is amazing, even though I couldn't really capture it on camera.

Notice I didn't list my topcoat - it's because I got disgusted and took it off before I got to topcoat.  I really should stop buying minty greens.

Friday, July 8, 2011

Savina - Money Tree

I've had Money Tree in my untrieds for a while now.  I earlier did a comparison between this and China Glaze - Cha Cha Cha and concluded that they are definitely dupe-y.  I also learned via the Nail Board that it's dupe-y to Moonpool, too.

I didn't feel like setting up the lightbox, so I don't have a bottle pic.  I might end up just using something similar, because I'm liking the way these nail photos turned out.


Basecoat:  Salon Sciences Fiberglass Network (1 coat)
Color:  Savina Money Tree (3 coats)
Topcoat:  Out the Door (1 coat)

Application was really nice.  Money Tree is a thin polish but I got good opacity with three coats.  I didn't have a lot of trouble with cleanup, and I wasn't particularly careful, either.  I did have a bit of an issue with bald spots on the second coat but I think that was more because I didn't have the right amount of polish on my brush.

In the bottle Money Tree looks like it might be brush-stroke-y, but once it's on, any brushstrokes are barely visible.

Saturday, July 2, 2011

Color Club - Glitter Envy and Starry Temptress

I picked up the Starry Temptress collection from Trans Design.  I love the Color Club neons, so this was a no-brainer.


Glitter Envy is a green .... creme?  jelly?  crelly?  with holographic glitter in it.  Starry Temptress is the matching glitter topcoat.

I meant to take photos of Glitter Envy on its own, and I totally forgot.  Anyway - the Starry Temptress polishes on their own?  Not good.  The base color is nice and opaque, but because of that the glitter just looks like little specks.  The last time I wore one of the polishes from this collection I tried wiping my cleanup brush dipped in acetone over the polish to see if that would help - no dice.


Basecoat:  Salon Sciences Fiberglass Network (1 coat)
Color:  Color Club Glitter Envy (3 coats)
Topcoat:  Color Club Starry Temptress (3 coats)
Topcoat:  Seche Vite (1 coat)

Application for these polishes is awful.  It is thick and gloopy, and not in a good way.  It still wants to run into cuticles, and the glitter likes to hang off the edge of the nail.  And, as I said earlier, the holo glitter is totally buried and just looks like white specks.  You really need to use the Starry Temptress topcoat to get the intended effect.  The texture is bad, too - it feels like sandpaper stuck to your nails.  The good part is that it's SO thick that three coats was enough for total opacity.

Unfortunately, Starry Temptress is also thick and gloopy.  It's not quite as thick as Glitter Envy, but it's still pretty thick.  It does, however, help even out the texture of Glitter Envy (this was the case with Ultra Astral, too).  I did use a coat of Seche on top of this - another coat might finish smoothing it out completely, but I'm OK with this as it is - it's already eight coats of polish, and six of them are pretty thick.

My recommendation?  Get the Starry Temptress topcoat, but use a creme, non-glitter base color.  I would skip the Starry Temptress polishes altogether.  It's a shame, because I was really looking forward to these, but it's just not worth the hassle.

Comparison - Savina Money Tree and China Glaze Cha Cha Cha

I was playing around in my stash this morning, trying to pick an untried to wear later this week.  I finally settled on Savina "Money Tree", which I've had in my untrieds for a while.  I was waiting around for the washer to finish before I did anything, and while I was waiting I thought, "huh, this looks kinda similar to Cha Cha Cha".  That's also in my untrieds, so I decided to pull that out and do a quick comparison.

In the bottle they are really, really close.  The Savina looks like it might be brush-stroke-y, but otherwise they are very similar.  I didn't set up my lightbox for this comparison, because I wanted to make sure I got different light sources, and now I think I might have found a different way to take NOTD pics.  Anyway, here are the bottle shots.

The Savina looks a little bit duller in this photo, but I think it's because the Savina is a little bit thinner.

Here they are at one coat each, over one coat of Fiberglass Network.


I have Cha Cha Cha on my index and ring fingers, and Money Tree on my middle and pinky fingers.  At one coat you can see that Cha Cha has a little bit more shimmer, and Money Tree seems to be a tiny bit deeper green.


This is two coats.  They're starting to get closer now - the Savina has a little bit of VNL, but it no longer looks much deeper green than Cha Cha Cha.


And here we are at three coats.  All the nail photos are taken next to a window on a sunny day (is there anything else in Texas this time of year?).  My middle finger is at a different angle, so it looks a lot greener, but you can see from my pinky finger that they're still really, really close.  Money Tree does have a teeny tiny bit of brush-stroke-y ness, but it's really not noticeable.

Verdict:  dupey dupe dupes.  You only need both of these if you're a green hoor.  I am, but I actually still don't know that I need both of these in my stash.